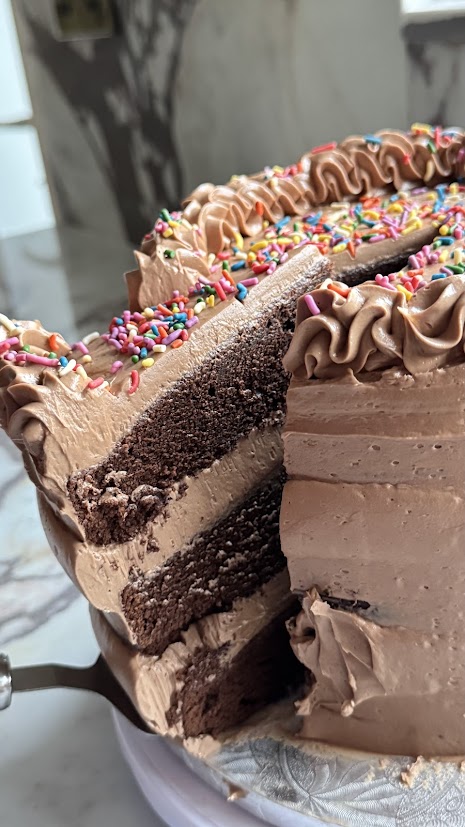
Three Layer Chocolate Moist Cake
About this recipe
Okay, so I have a confession to make — and it feels dramatic to finally say it out loud. For the longest time, I simply couldn’t decorate a cake. Like, at all. And before you reassure me, let’s be honest: as someone who cooks and bakes every single week, that’s a bit embarrassing. I could whisk a custard blindfolded, troubleshoot a collapsed loaf, tell you exactly why your cookies spread too much — but hand me a spatula and ask for a smooth cake finish? Disaster. Buttercream ridges, crumbs everywhere, and a finish so lumpy I wanted to cry and throw the whole thing in the bin.
Then came the chaos of my house renovation (because why not schedule life crises in clusters?). In the middle of plaster dust, paint samples and an ongoing hunt for the spirit level, I decided that this — of all times — was when I would finally learn how to properly decorate a cake. Terrible timing, I know. But sometimes determination arrives dressed as madness.
So I did what any desperate baker does: I turned it into a baking boot camp. I tested four different buttercreams — American buttercream, Swiss meringue buttercream, Russian buttercream and Italian meringue buttercream — and let’s just say it was a costly and very interesting experience. But after many trials, lots of swearing under my breath, and a few breakdowns involving an offset spatula, one buttercream came out on top.
Swiss. Meringue. Buttercream.
The holy grail. The answer to smooth cakes. The moment I learnt how to make it properly, something clicked. For the first time in my baking life, I smoothed the sides of a cake and it didn’t fight back. It didn’t crumble. It didn’t tear. It didn’t melt. It just… behaved. I stood there like I’d unlocked a new level in my baker era. I finally felt like a proper baker.
And now that I’ve learnt it — and dare I say, perfected it — it’s only right that I share everything with you. If you’ve ever struggled with decorating a cake, if you’re tired of buttercream that’s too sweet, too gritty or too soft, if you’ve scraped frosting off plates at parties because it’s unbearably sugary, Swiss meringue buttercream is the game-changer you’ve been waiting for.
Before we get to troubleshooting tips and why this buttercream works magic, let’s talk cake — because what’s buttercream without the dream cake underneath?
The chocolate cake recipe I’m pairing with this buttercream comes straight from my cookbook Sugar & Spice — but for today, we’re adapting it from a two-layer cake to a three-layer masterpiece. Because if you’re going to learn cake decorating, you may as well go big or go home. This cake is rich, fudgy and impossibly moist. And before you panic about the coffee in the batter — trust me, you cannot taste it. Coffee simply deepens the chocolate flavour and brings out that luxurious richness. If you’re making a chocolate cake and it doesn’t contain actual chocolate… please throw the recipe away. We don’t do that here.
Now let’s talk about the buttercream — specifically why Swiss meringue buttercream deserves its crown.
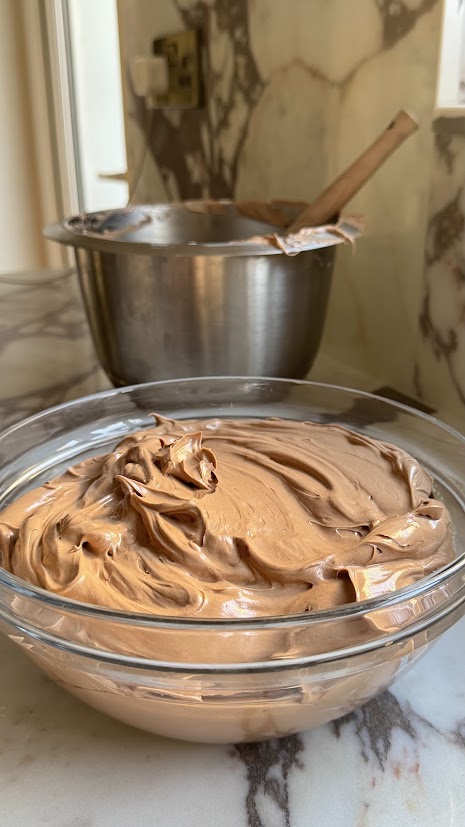
Unlike American buttercream, which is made by beating butter and icing sugar, Swiss meringue buttercream starts by gently heating egg whites and sugar over steam until the sugar dissolves and the mixture becomes glossy and smooth. That syrupy base is then whipped into a light, fluffy meringue before cubes of softened butter are added slowly. It transforms into the silkiest, creamiest frosting you’ll ever taste. It pipes beautifully, spreads effortlessly, and — the best bit — it’s not overly sweet. You actually want to eat it rather than scrape it off the cake.
I know it might sound like more work compared to American buttercream, but trust me — every extra minute is worth it for that glass-smooth finish and impossibly light texture. Once you start using Swiss meringue buttercream, you’ll never want to go back.
And since we’re all grown-ups here and no baking story is complete without honesty, let’s talk about the two problems that scare everyone the first time they make Swiss meringue buttercream:
➤ “My buttercream split!”
If your buttercream looks curdled, don’t panic — it simply means your butter was too cold compared to your meringue. Just keep mixing; the friction will warm the butter and it will come together beautifully. If it’s really cold, blast the bowl with 5 seconds of gentle heat from a hairdryer or sit it over a warm water bath for 10 seconds at a time and keep mixing.
➤ “My buttercream won’t come together — it looks soupy!”
That means the meringue was still too warm when you added the butter, so the butter has melted. Pop the bowl in the fridge for 10–15 minutes, then whisk again. Almost magically, it transforms back into that velvety cloud.
Once you master temperature (and it takes one attempt, truly), you’ll fly.
And here’s the best part: Swiss meringue buttercream makes cake decorating easier. Much easier. You don’t need professional skills — you just need the right frosting. Smooth sides become achievable. Crumb coats become satisfying. And the final finish? Pure joy.
So whether you're decorating your first cake or your fiftieth, this recipe is going to make you feel like the baker you’ve always wanted to be — confident, proud and willing to show off your cake instead of hiding it.
If you’re ready to make the smoothing-tool-down, happy-dancing, “oh my goodness I did THAT” kind of chocolate cake, grab your ingredients, clear some counter space and preheat the oven. We’re building a three-layer masterpiece that looks incredible, tastes even better, and showcases the star of the show — the silky Swiss meringue buttercream that changed everything.
Ingredients
Chocolate Fudge Cake
- 200g unsalted butter, plus extra for greasing
- 150g dark chocolate
- 440g plain flour
- 90g cocoa powder
- 560g light brown sugar
- 4 tsp baking powder
- 1 tsp bicarbonate of soda
- 1 tsp flaky salt
- 6 large eggs
- 4 tbsp vegetable oil
- 200ml whole milk
- 300ml coffee
Chocolate Swiss Meringue Buttercream
- 300g egg whites
- 600g caster sugar
- 750g unsalted butter, softened
- 100g dark chocolate
- 150g milk chocolate
Ingredients
Instructions
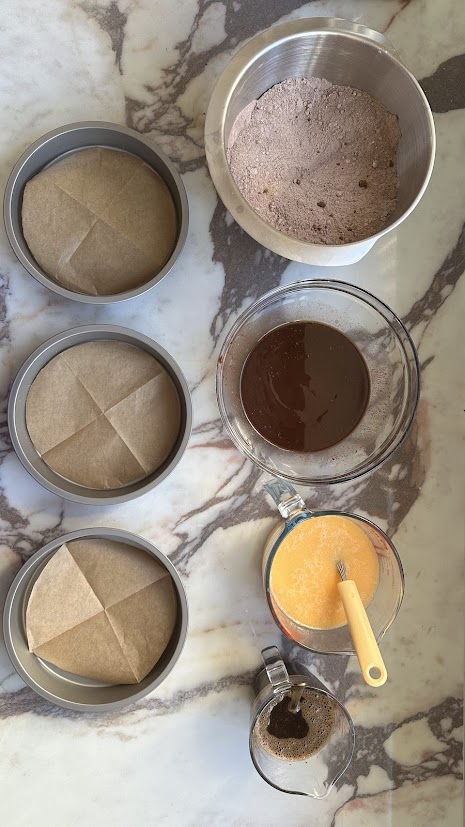
- Preheat the oven to 180°C. Grease and line three 20cm cake tins with baking paper.
- Melt the dark chocolate and butter together in the microwave (20–30 second bursts, stirring between each) or over a bain-marie until fully melted. Stir smooth and set aside to cool slightly.
- In a large bowl, add cocoa powder, brown sugar, flour, baking powder and bicarbonate of soda. Whisk well to ensure everything is evenly combined.
- In a separate bowl, whisk together the milk, eggs and oil, then set aside.
- Prepare 300ml hot coffee using boiling water and set aside.
- Add half of the egg–milk mixture to the dry ingredients and mix until a thick paste forms. Then slowly stream in the remaining wet mixture while mixing to avoid lumps.
- Once smooth, pour in the cooled melted chocolate and butter mixture and mix until incorporated.
- Slowly pour in the hot coffee, mixing on low speed. The batter will be thin — this is correct.
- Divide the batter evenly between the three cake tins, filling each about ½ to ⅔ full to allow room for rising.
- Bake for 25 minutes or until the centres spring back when lightly pressed. Remove from the oven and leave to cool in the tins for 10 minutes.
- After 10 minutes, turn the cakes out of the tins. Wrap each warm layer tightly in cling film and allow to cool completely. This traps moisture and keeps the cakes soft.
- To make the chocolate Swiss meringue buttercream, place egg whites and sugar in a heatproof bowl and whisk by hand just to combine. Place over a bain-marie, whisking continuously, until the sugar has dissolved (about 5–6 minutes). You can test by rubbing mixture between your fingers — it should feel smooth, not gritty.
- Pour the warm mixture into a stand mixer bowl fitted with the whisk attachment and whisk on medium-high for about 15 minutes, until the bowl feels cool and you have stiff peaks.
- Once the meringue is cool and stiff, slowly add the butter a little at a time with the mixer on medium speed (see notes if it looks loose — it corrects easily). When smooth and silky, mix in the melted chocolate until fully combined.
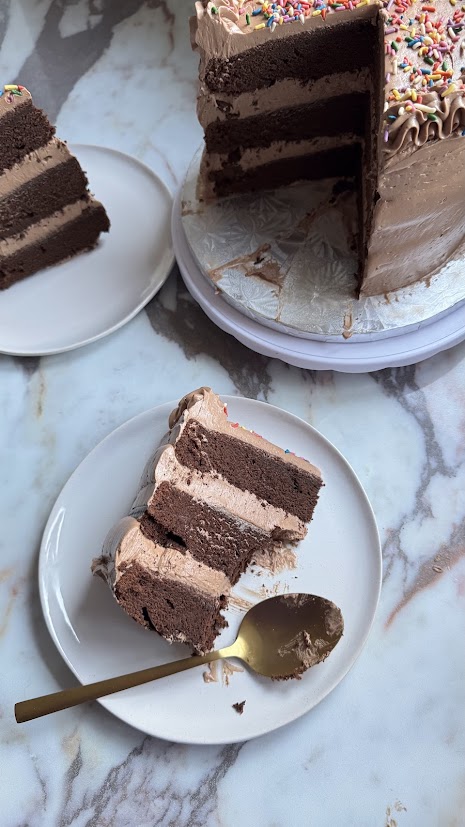
- To assemble the cake, make sure the cake layers are completely cold — warm cake will melt the buttercream. Start by spreading a layer of buttercream on top of the first cake layer like you’re buttering toast, then stack the second and third layers, repeating.
- Apply a thin coat of buttercream over the entire cake for a crumb coat. This traps the loose crumbs. Chill in the fridge for 30 minutes.
- After chilling, apply the final layer of buttercream, again spreading from the top and working your way down the sides. For a super smooth finish, run a hot metal scraper (heated under boiling water and dried) around the cake to remove air bubbles and smooth the surface.

Hi, I'm Remi
Follow me on socials to stay connected!
Pin this Recipe
More like this

More recipes like this
Tempted by something else?


Work with me, or ask me a question!
I'm all about teaming up with cool new brands that align with my audience and make cooking awesome meals a breeze. Drop me a line, and let's cook up some exciting plans together!

Want free recipes and insider knowledge in your inbox?
Subscribe Below!