The Best Chewy Chocolate Chip Cookies

About this recipe
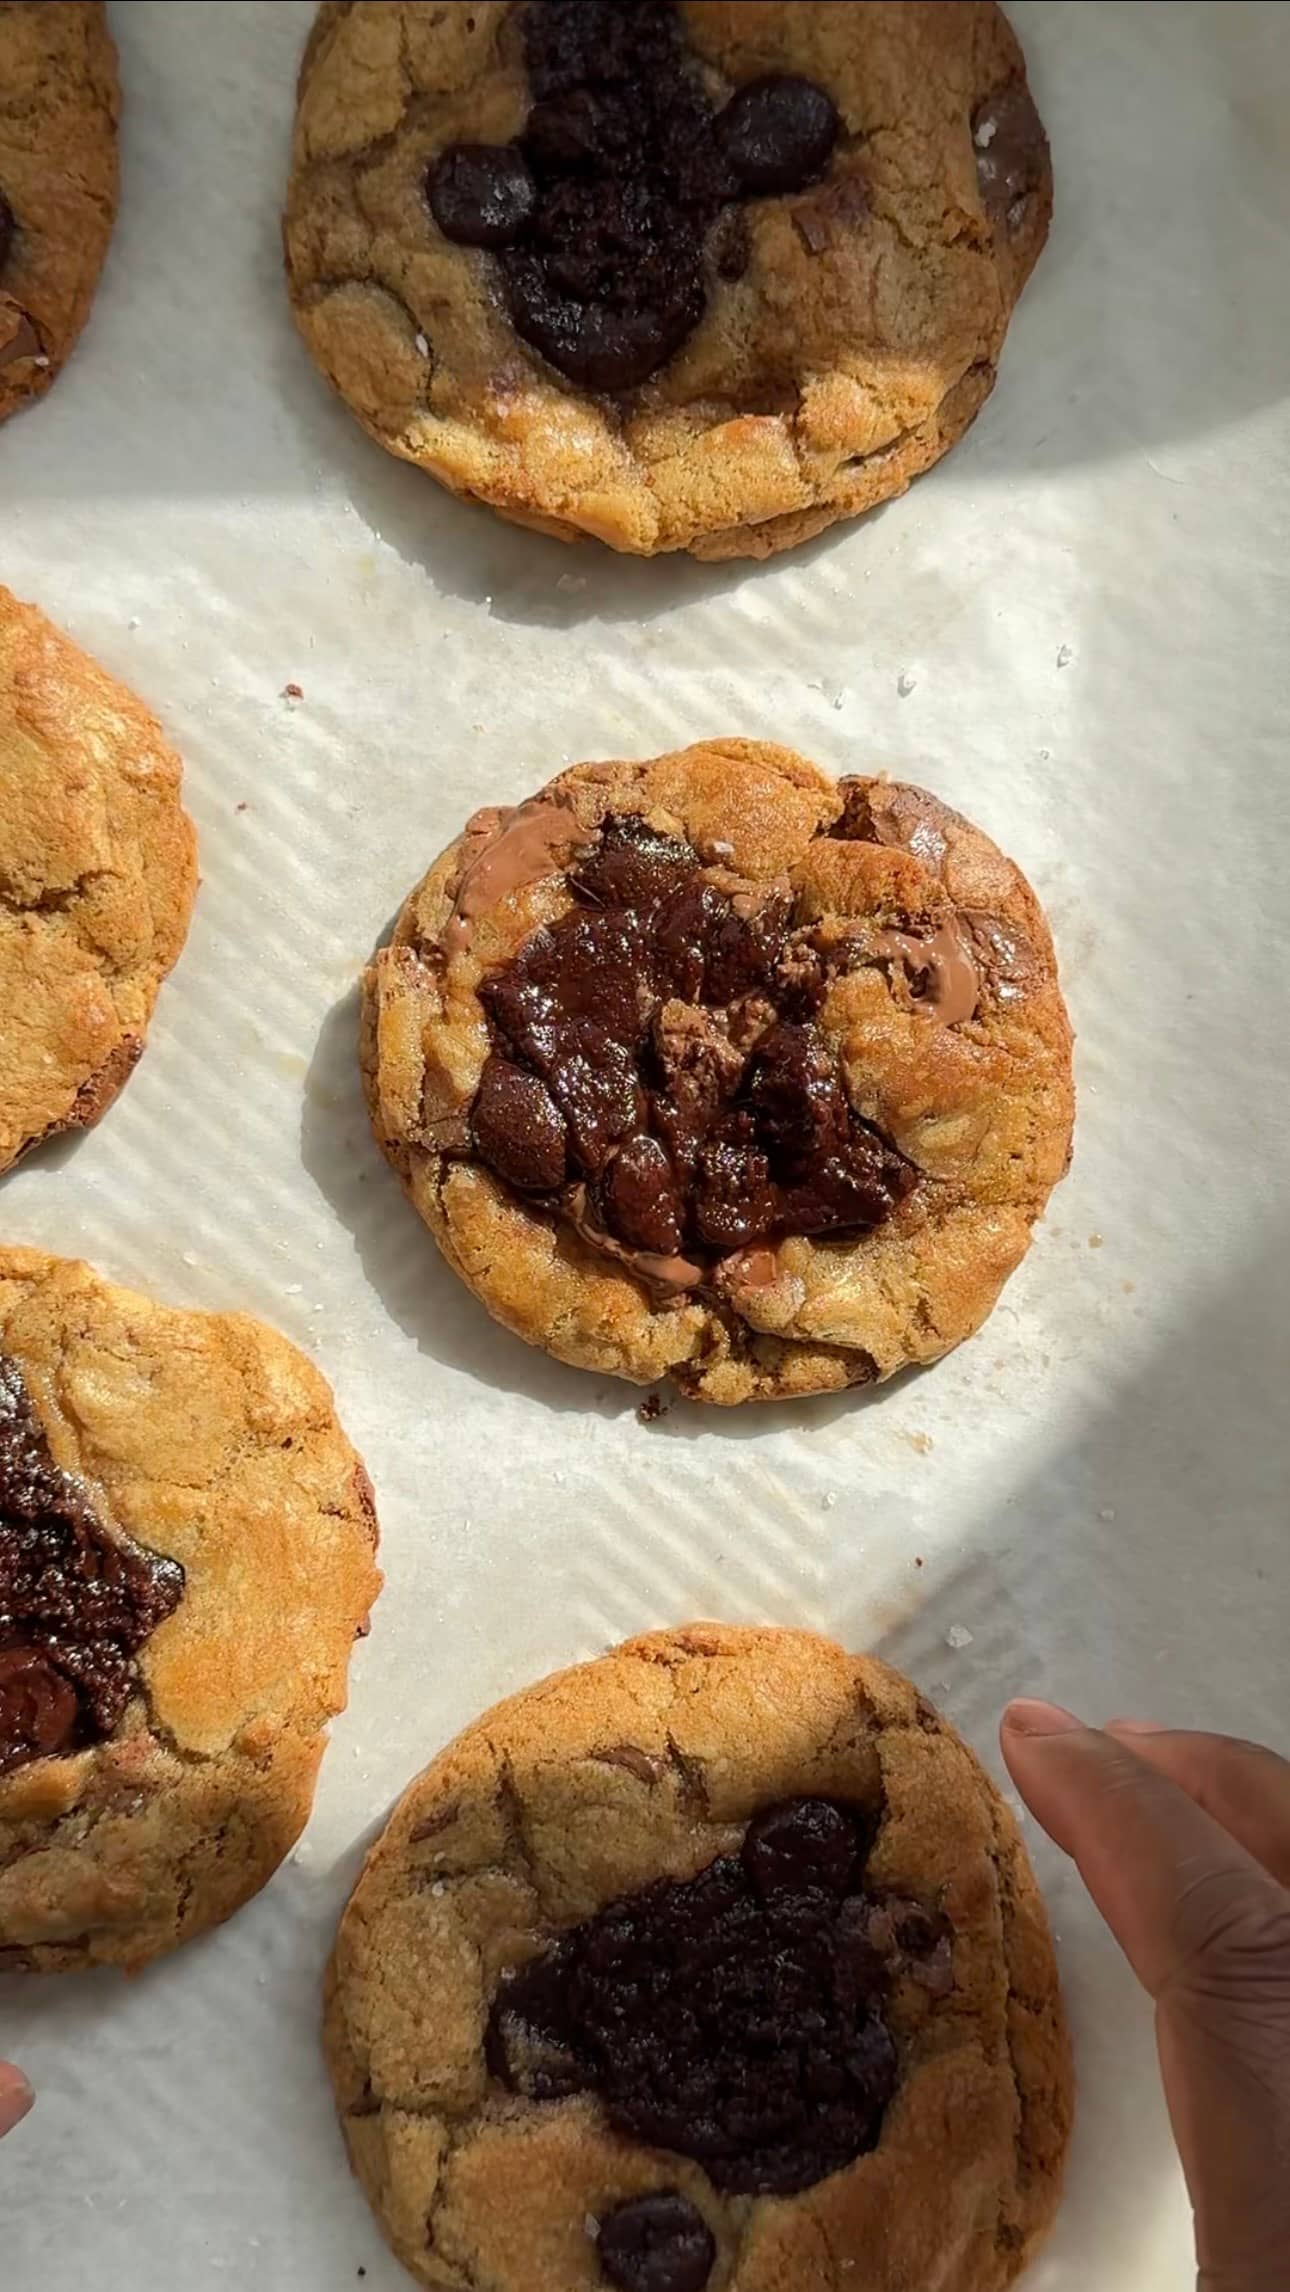
With every bite of these cookies, you’re greeted with textures and flavours — rich pools of melted dark and milk chocolate, perfectly balanced with a sprinkle of flaky sea salt. The edges have just the right amount of crispness, giving a satisfying snap when you bite in, while the centre remains soft, chewy, and wonderfully decadent. It’s the kind of sensory experience that makes you pause mid-bite, close your eyes, and savour the moment — and then immediately go back for another.
These cookies aren’t just good straight out of the oven; they stay chewy for days, thanks to a few key techniques: browned butter, a combination of sugars, and resting the dough before baking. Even on day three, they taste as if they just came out of the oven. In fact, they arguably get even better with time as the flavours deepen and meld together. That makes them ideal for everyday indulgence — bake a batch on Sunday, and you’ve got a little luxury waiting for you all week long.
But what really makes these cookies special is their versatility. They can be baked fresh, stored for later, or even frozen as raw dough. Pop a frozen ball of dough straight into the oven, and you’ll have warm, gooey cookies in under 15 minutes with zero extra effort. Whether you’re hosting last-minute guests, looking for a midnight snack, or needing a homemade gift, these cookies have you covered.
So, whether you’re craving a comforting treat with your afternoon tea or trying to impress friends with a crowd-pleasing dessert, these chewy brown butter chocolate chip cookies are a guaranteed hit. They’re easy to make, endlessly chewy, and impossibly delicious — a true delight for cookie lovers everywhere.
Butter
If there’s one ingredient that truly elevates these cookies, it’s brown butter. Ordinary melted butter adds richness, but browned butter brings depth, complexity, and irresistible nuttiness that takes a simple cookie to extraordinary heights.
The process of browning butter is simple yet transformative. As the butter heats, the milk solids sink to the bottom of the pan and caramelize, turning a deep golden brown and releasing a toasty, almost hazelnut-like aroma. This stage is where the magic happens — those tiny browned bits infuse the entire dough with a warm, savoury sweetness that pairs perfectly with the sugar and chocolate.
Brown butter also affects texture. It adds richness and moisture, helping create a soft, chewy centre while giving just enough structure for crispy edges. It’s a two-for-one win: flavour and texture improvement in a single step.
How to make brown butter:
- Place your butter in a light-coloured saucepan (so you can see the colour change clearly).
- Melt over medium heat, swirling the pan occasionally.
- Once melted, continue cooking. The butter will foam, then bubble vigorously.
- Watch carefully as the foam subsides and brown specks form at the bottom.
- When it turns a deep golden brown and smells nutty, immediately remove it from the heat.
Pro tip: Pour the browned butter into a heatproof bowl right away to stop the cooking process — burnt butter tastes bitter.
Sugars
The perfect cookie needs the perfect balance of sugars. In this recipe, we use a mix of soft brown sugar and caster sugar, and each plays an important role.
- Brown sugar contains molasses, which brings a deep, caramel-like sweetness and a hint of warmth. Its moisture content also makes the cookie dough extra soft and helps create that desirable chewiness that lasts for days.
- Caster sugar, on the other hand, is finely ground and dissolves quickly. It provides structure, helps the cookies spread evenly, and gives the edges that lovely crisp texture.
By combining both sugars, you get the best of both worlds: a rich, chewy centre with delicately crisp edges. This balance is what makes bakery-style cookies so addictive.
Cornstarch
Adding a small amount of cornstarch to the dough might seem unusual, but it’s one of the best tricks for bakery-style cookies. Cornstarch softens the structure of the dough, resulting in an incredibly tender, melt-in-your-mouth texture.
It also helps control spreading during baking, so your cookies stay thick and perfectly shaped rather than flattening into puddles. This is especially helpful when using melted butter like browned butter, which tends to encourage spreading.
The result? Picture-perfect cookies with a tender crumb and those thick, chewy centres you love.
The Importance of Chilling the Dough
One of the biggest mistakes people make with cookies is skipping the chilling step. Resting the dough in the fridge is a MUST it does wonders for both flavour and texture.
Here’s why chilling matters:
- Butter firms up: Cold butter melts more slowly in the oven, helping the cookies hold their shape and rise instead of spreading too quickly.
- Flavour develops: Just like marinating meat, giving your dough time to rest allows the flavours to meld together, deepening and becoming more complex.
- Better texture: Chilling hydrates the flour fully, creating a smoother dough and a more consistent bake.
If you’ve ever wondered why bakery cookies taste so rich and complex, this is often the secret. Patience pays off.

Step-by-Step Baking Tips
- Measure accurately. Baking is a science, so use a digital scale if you have one. Too much flour can make cookies dry and cakey.
- Don’t over-mix. Once you add the flour, mix only until the dough comes together. Over-mixing develops gluten, leading to tough cookies.
- Use room-temperature eggs. They incorporate more smoothly into the dough, creating a cohesive texture.
- Bake on light-coloured trays. Dark trays absorb heat faster, which can burn the bottoms before the centres are done.
- Leave space between cookies. They need room to spread for even baking.
Chewy Chocolate Chip Cookies FAQs
How do I know when the cookie is done cooking?
The cookies should be a light brown around the edges, while the centre might appear uncooked once cooled this will give a chewy cookie.
Can I ommit eggs?
Yes! Please check my vegan chocolate chip cookie.
What cookie scoop do you use?
The link to my cookie scoop can be found here.
What is browned butter?
Brown butter, is butter that has been heated until the milk solids turn golden brown. This process gives the butter a nutty aroma and a rich, caramelized flavor. To make brown butter, you simply melt butter over low to medium heat, stirring frequently, until it turns a deep golden brown color.
Why do baking sheets need to be light coloured?
Dark coloured baking sheets absorb heat faster, therefore the bottom of your cookie can cook faster than the top of your cookies which reduced the chance of a gooey centre cookie.
Ingredients
- 225g unsalted butter, cubed
- 150g caster sugar
- 150g light brown sugar
- 3 large egg yolks
- 30ml whole milk
- 270g plain flour
- 1 1/2 tsp baking powder
- 3/4 tsp bicarbonate soda
- 3 tbsp cornstarch
- 150g dark chocolate, chopped
- 150g milk chocolate, chopped
- 450g unsalted butter, cubed
- 300g caster sugar
- 300g light brown sugar
- 6 large egg yolks
- 60ml whole milk
- 540g plain flour
- 3 tsp baking powder
- 1 1/2 tsp bicarbonate soda
- 6 tbsp cornstarch
- 300g dark chocolate, chopped
- 300g milk chocolate, chopped
- 675g unsalted butter, cubed
- 450g caster sugar
- 450g light brown sugar
- 9 large egg yolks
- 90ml whole milk
- 810g plain flour
- 4 1/2 tsp baking powder
- 2 tsp bicarbonate soda
- 9 tbsp cornstarch
- 450g dark chocolate, chopped
- 450g milk chocolate, chopped
Ingredients
- 7.9oz unsalted butter, cubed
- 5.9oz caster sugar
- 5.9oz light brown sugar
- 3 large egg yolks
- 30ml whole milk
- 9.5g plain flour
- 1 1/2 tsp baking powder
- 3/4 tsp bicarbonate soda
- 3 tbsp cornstarch
- 5.9oz dark chocolate, chopped
- 5.9oz milk chocolate, chopped
- 16oz unsalted butter, cubed
- 11oz caster sugar
- 300g light brown sugar
- 6 large egg yolks
- 60ml whole milk
- 19oz plain flour
- 3 tsp baking powder
- 1 1/2 tsp bicarbonate soda
- 6 tbsp cornstarch
- 11oz dark chocolate, chopped
- 11oz milk chocolate, chopped
- 24oz unsalted butter, cubed
- 16oz caster sugar
- 16oz light brown sugar
- 9 large egg yolks
- 90ml whole milk
- 28.5oz plain flour
- 4 1/2 tsp baking powder
- 2 tsp bicarbonate soda
- 9 tbsp cornstarch
- 16oz dark chocolate, chopped
- 16oz milk chocolate, chopped
Instructions
- Start by cubing the unsalted butter into small, evenly sized pieces. This helps the butter melt evenly when you brown it later.
- In a saucepan over medium heat, melt the cubed butter. Once melted, continue to cook, stirring frequently, until the butter turns a golden brown colour and has a nutty aroma. This process usually takes about 5-7 minutes. Be careful not to burn it. Browning the butter adds a rich, caramelized flavour to the cookies.
- Allow the browned butter to cool slightly before using it in the dough.
- In a large mixing bowl, cream together brown butter, caster sugar and brown sugar.
- Once combined, add the egg yolks and milk to the butter mixture. Mix until well combined.
- In a separate bowl, sift together the plain flour, baking powder, bicarbonate soda and cornstarch. Sifting helps to remove any lumps and ensures even distribution of the leavening agents.
- Gradually add the dry ingredients to the wet mixture, stirring until a smooth dough forms.
- Gently fold in the chopped dark chocolate and milk chocolate into the cookie dough. Using chopped chocolate instead of chocolate chips ensures that the chocolate melts evenly throughout the cookies, enhancing their flavour and texture.
- Wrap the cookie dough in plastic wrap or transfer it to an airtight container. Refrigerate the dough for at least 24 hours, or up to 48 hours. Chilling the dough allows the flavors to develop and helps the cookies maintain their shape during baking.
- Preheat your oven to 180 degrees celsius.
- Line a light-coloured baking sheet with parchment paper. Make sure to use a baking sheet large enough to accommodate the cookies with space in between.
- Using a cookie scoop or spoon, portion the chilled dough into balls and place them onto the prepared baking sheets. Make sure to leave enough space between each cookie dough ball to allow for spreading during baking. Roughly, a 30cm baking sheet should hold about 3 cookies to prevent them from merging together.
- Optionally, before placing cookies in the oven add chopped chocolate on top of cookie dough to get that bakery-style flair.
- Place the baking sheets in the preheated oven and bake the cookies for 10-12 minutes or until they are golden brown around the edges, don't worry if the inner circle of the cookie still seems uncooked by the time these cool it will be fine.
- Once baked, allow the cookies to cool on the baking sheets for at least 6 minutes before transferring them to a wire rack to cool completely.
-

Hi, I'm Remi
Follow me on socials to stay connected!
Pin this Recipe
More like this


More recipes like this
Tempted by something else?


Work with me, or ask me a question!
I'm all about teaming up with cool new brands that align with my audience and make cooking awesome meals a breeze. Drop me a line, and let's cook up some exciting plans together!

Want free recipes and insider knowledge in your inbox?
Subscribe Below!